Global HR Articles Center
Feature: Contract Employee List
Purpose:
- Separates contract employees (those working for a limited period) from permanent employees within the system.
- Stores essential contract details for efficient management.
Key Points:
- Add New Contract Employee:
- Enter contract details (date, start/end dates, compensation, status, number, shift, remarks).
- Add employers or witnesses if required.
- “Import Excel” Data:
- Manage multiple contracts using a template.
- “Download template”, fill in mandatory fields (red headers), and import.
- Validate data before importing.
- Find Contract Employee List:
- Filter by period, employee, contract type, and other criteria.
- Preview and export data to Excel.
Step-by-Step Guide to Creating a New Contract Employee:
Add New Contract Employee:
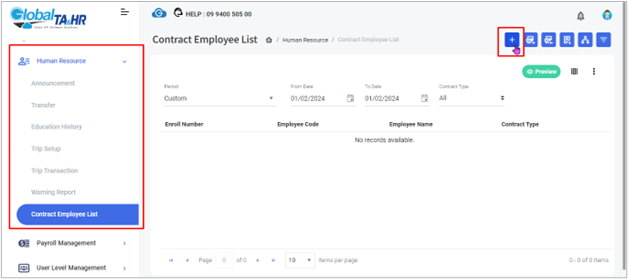
- Access the Contract Employee List:
- From the left menu panel, navigate to “ Human Resource.”
- Select “ Contract Employee List.”
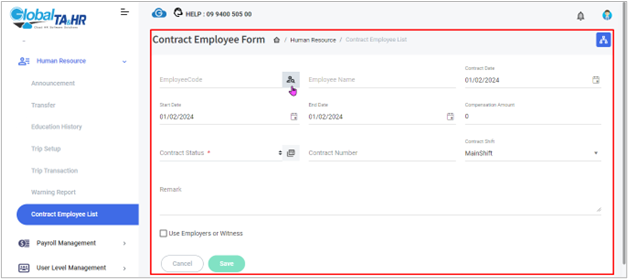
- Add New Contract Employee (Manual Entry):
- Click “ Add New.”
- Click the “ Find” icon to select the employee.
- Fill in contract details:
- Contract Date
- Start Date
- End Date
- Compensation Amount
- Contract Status (create first if needed)
- Contract Number
- Contract Shift
- Remark (optional)
- If applicable, check “ Use Employers or Witness” and add those details.
- Click “ Save.”
- Import Contract Employees (Excel Template):
- Click “ Download Template” .
- Open the template and fill in mandatory fields (red headers).
- Click “ Import Excel” .
- Browse and select the completed Excel file.
- Click “ Validate” to check for errors.
- If valid, click “ Import.”
- Find Contract Employee List:
- Select a period in the “ Period” box.
- Choose employees by organization structure or filter by employee.
- Apply additional filters as needed (e.g., contract type).
- Click “ Preview” to view results.
- Click “ Export Excel” to download data.
- Create Contract Status Options (if needed):
- Click the setup icon.
- Write the contract status name.
- Click “ Save.”
Key Points:
- Ensure all mandatory fields are filled in the template before importing.
- Use the “ Use Employers or Witness” option based on contractual needs.
- Always validate data to catch errors before importing.
- Utilize filters to refine search results.
Additional Information:
- Contract status options must be created before use.
- The “ Contract Shift” field specifies the assigned shift during the contract period.
- The “ Remark” field allows for additional notes or comments.
Screenshots: