GlobalTA&HR Articles Center
Feature: Claim
Purpose:
- Claim: Request reimbursement for work-related expenses.
- Leave from OT: Claim replacement leave days for overtime worked.
Key Points:
- Customizable Claim Names: Define different claim categories (e.g., travel, transport, mobile) and manage them by user role.
- User Permissions: Control which users can submit claims and approve them through User Level settings.
- Mobile App Submission: Employees easily submit claims with photos and descriptions through the mobile app.
- Leave from OT: Claim replacement leave for overtime days worked on holidays.
- Approvals and Reports: Managers review and approve claims on mobile or web, and access detailed reports.
Steps:
- Setting Up Claims (for HR/System Admin):
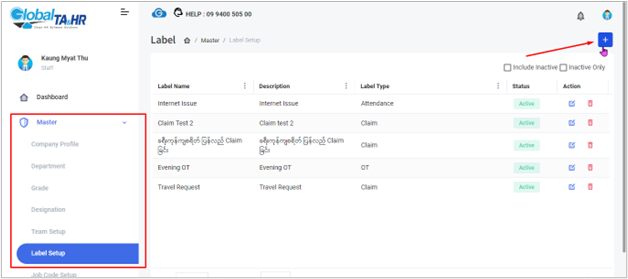
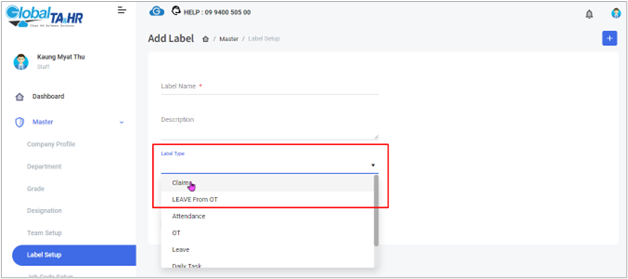
Claim Names:
- Open Global TA Cloud Web URL.
- Go to Master Menu > Label Setup.
- Click “ Add New” and define claim names and descriptions.
- Set “ Label Type” to “ Claim.”
- Click “ Save.”
User Permissions:
- Go to User Level Management > User Level Control.
- Find user levels (e.g., employee, supervisor, manager) and click Access Permission.
- Grant appropriate Claim menu permissions (e.g., ClaimRequest, ClaimApprove, Claim Report) based on user level.
- For “ Approver/Final Approver” settings, refer to https://www.globalta.com.mm/support/approver/
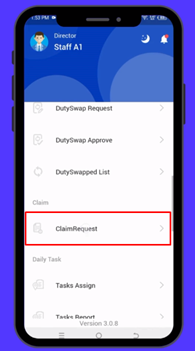
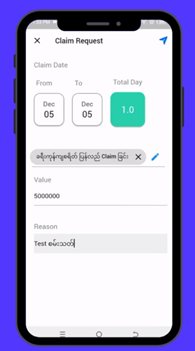
- Submitting Claims (Employee):
- Open Global TA Cloud Mobile App.
- Go to “More Settings” > Claim Request.
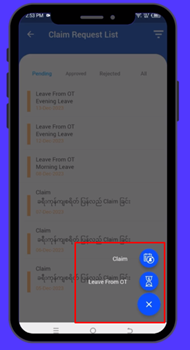
- Click “ Add” and choose a claim category.
- Select the claim date, value, and reason.
- Attach photos (optional) and click “ Send.”
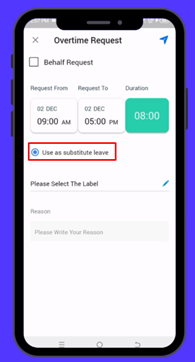
- Leave from OT Claims:
- Follow the steps for submitting claims (above).
- In the Overtime Request Form, check the “ Use as Substitute Leave” option for overtime worked on holidays.
- If the option isn’t available, log out and log back in, or contact HR or Global TA Cloud Operator Service.
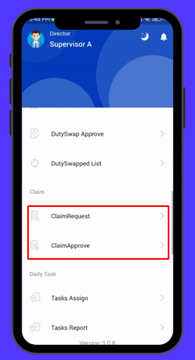
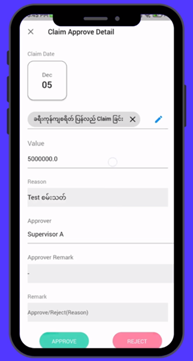
- Approving Claims (Manager):
Mobile App:
- Go to “More Settings” > Claim Approve.
- Check claim requests under the “ Pending” tab.
- Click on a request, review details, and click “ Approve” or “ Reject.”
- Web Browser:
- Go to Claim Menu > Claim Approve.
- Choose period, request type, label, and filtering options.
- Click “ Preview” to see claims.
- Click “ Approve,” “ Reject,” “ View Detail,” or “ Delete” under the Action column.
- Claim Reports (for HR/Manager):
- Open Global TA Cloud Web URL.
- Go to Claim Menu > Claim Report.
- Choose period, request type, label, and filtering options.
- Select a custom template or choose “ Choosing Columns” to customize the report.
- Click “ Preview” to see the report.
Tips:
- For Leave from OT balance details, click “ Balance Detail View” in Claim Report.
- To set claim expiry days, go to System > System Setting > Application Option > General > Claim Restricted Days.
Additional Resources:
- Approver settings: https://www.globalta.com.mm/support/approver/
- Global TA Cloud Operator Service: Mobile App > “More Settings” > Chatwoot
Screenshots: