
Payroll Management
Payroll Management бАЖбА≠бАѓбАРбАђбАШбАђбАЬбА≤?
Payroll Management бАЖбА≠бАѓбАРбАђбАЮбАКбАЇ бАЫбА≠бАѓбАЄбАЫбА≠бАѓбАЄбАЫбАЊбАДбАЇбАЄбАЫбАЊбАДбАЇбАЄ бАХбАЉбА±бАђбАЫбАЬбАїбАЊбАДбАЇ бА°бАЬбАѓбАХбАЇбАЫбАЊбАДбАЇбАЩбАїбАђбАЄбАЩбАЊ бБАбАФбАЇбАСбАЩбАЇбАЄбАЩбАїбАђбАЄбА°бАђбАЄ бАЬбАѓбАХбАЇбАБбАЬбАЕбАђ бАХбА±бАЄбАЮбАКбАЈбАЇ бАЬбАѓбАХбАЇбАДбАФбАЇбАЄбАЕбА•бАЇ бАЦбАЉбАЕбАЇбАХбАЂбАЮбАКбАЇбБЛ бАЭбАФбАЇбАСбАЩбАЇбАЄ бА°бАЬбАѓбАХбАЇбАБбАїбА≠бАФбАЇбАЩбАїбАђбАЄбААбА≠бАѓ бАРбАљбААбАЇбАБбАїбААбАЇбАБбАЉбАДбАЇбАЄбБК бАЭбАФбАЇбАСбАЩбАЇбАЄбАЩбАїбАђбАЄбА°бАђбАЄ бА°бАБбАїбА≠бАФбАЇбАЩбАЊбАЃ бАЬбАЕбАђ бАХбА±бАЄбАЖбА±бАђбАДбАЇбАБбАЉбАДбАЇбАЄбБК бА°бАЕбА≠бАѓбАЄбАЫ бА°бАБбАљбАФбАЇбАФбАѓбАРбАЇбАБбАЉбАДбАЇбАЄбАФбАЊбАДбАЈбАЇ бАЬбАѓбАХбАЇбАДбАФбАЇбАЄбАРбАЕбАЇбАБбАѓбАЬбАѓбАґбАЄбБП бАШбАПбАєбАНбАђбАЫбА±бАЄ бАСбА≠бАФбАЇбАЄбАЮбА≠бАЩбАЇбАЄбАБбАЉбАДбАЇбАЄбАЬбАѓбАХбАЇбАДбАФбАЇбАЄбАЕбАЙбАЇ бА°бАФбА±бАФбА≤бАЈ бА°бАЫбА±бАЄбААбАЉбАЃбАЄбАЮбА±бАђ бА°бАБбАФбАЇбАЄбААбАПбАєбАН бАЩбАЊ бАХбАЂбБАбАДбАЇбАХбАЂбАЮбАКбАЇбБЛ
Payroll Management бАРбАљбАДбАЇ бАШбАЪбАЇбАЬбА≠бАѓ processбАРбАљбА± бАХбАЂбБАбАДбАЇбАЩбАЊбАђбАЬбА≤?
Payroll Management бАРбАљбАДбАЇ Process – 3 бАЩбАїбА≠бАѓбАЄбАЖбА≠бАѓбАХбАЉбАЃбАЄ бАБбАљбА≤бАБбАЉбАђбАЄбАЬбА≠бАѓбАЈ бАЫбАФбА≠бАѓбАДбАЇбАХбАЂбАЮбАКбАЇбБЛ
- Pre-Payroll Process
бАХбАСбАЩ бА°бАЖбАДбАЈбАЇбА°бАФбА±бАФбА≤бАЈ Define Payroll Policy- бАЬбАЕбАђбАРбАљбААбАЇбАБбАїбААбАЇбАЩбАЊбАѓбБП бАЦбА±бАђбАЇбАЩбАЉбА∞бАЬбАђбАЩбАїбАђбАЄбБК бАЮбАРбАЇбАЩбАЊбАРбАЇбАБбАїбААбАЇ- rule бАЩбАїбАђбАЄбААбА≠бАѓ бА°бАЫбАДбАЇбАЖбАѓбАґбАЄбАЮбАРбАЇбАЩбАЊбАРбАЇбАЫбАЩбАКбАЇбАЦбАЉбАЕбАЇбАХбАЂбАЮбАКбАЇбБЛ Rule бАЮбАРбАЇбАЩбАЊбАРбАЇбАБбАїбААбАЇбАЩбАїбАђбАЄбАРбАљбАДбАЇ Attendance Rule,Leave Rule,OT Rule,Pay Rule бАЩбАїбАђбАЄбА°бАФбА±бАФбА≤бАЈбАХбАЂбАЫбАЊбА≠бАРбАРбАЇбААбАЉбАХбАЂбАЮбАКбАЇбБЛ Rule бАЩбАїбАђбАЄбААбА≠бАѓ customizing бА°бАЮбАѓбАґбАЄбАХбАЉбАѓбАФбА≠бАѓбАДбАЇбАХбАЂбАЮбАКбАЇбБЛ
бАТбАѓбАРбА≠бАЪбА°бАЖбАДбАЈбАЇ бА°бАФбА±бАФбА≤бАЈ Gathering Payment for Import Excel- бАЬбАЕбАђбАРбАљбААбАЇбАБбАїбААбАЇбАЩбАЊбАѓбА°бАРбАљбААбАЇ бАЬбА≠бАѓбА°бАХбАЇбАЮбА±бАђ бА°бАБбАЉбА±бАБбАґбАЬбАЕбАђ- Basic Salary, бА°бАБбАЉбАђбАЄбАБбАґбАЕбАђбАЄбАБбАљбАДбАЈбАЇбАЩбАїбАђбАЄ-Allowances, бА°бАБбАЉбАђбАЄбАЮбА±бАђ Bonus- бА°бАХбА≠бАѓбАБбАґбАЕбАђбАЄбАБбАљбАДбАЇбАЈбАЩбАїбАђбАЄ, бА°бАБбАЉбАђбАЄбАЮбА±бАђ бАЬбАЕбАђбА°бАХбАЉбА±бАђбАДбАЇбАЄбА°бАЬбА≤бАЩбАїбАђбАЄ бАЖбА≠бАѓбАХбАЉбАЃбАЄ бАЕбАЮбАЦбАЉбАДбАЇбАЈ бА°бАБбАїбААбАЇбА°бАЬбААбАЇбАЩбАїбАђбАЄбААбА≠бАѓ бА°бАЫбАДбАЇ бАСбАКбАЈбАЇбАЮбАљбАДбАЇбАЄ бАХбА±бАЄбАЫбАХбАЂбАЩбАКбАЇбБЛ
- Actual Payroll Calculation & Approve Process
Pre-Payroll process бАЩбАїбАђбАЄ бАХбАЉбАЃбАЄбАФбА±бАђбААбАЇ Payroll calculation бАЬбАѓбАХбАЇбАЫбАХбАЂбАЩбАКбАЇбБЛ бАРбАљбААбАЇбАБбАїбААбАЇбАХбАЉбАЃбАЄбАЮбА±бАђ payment бАЩбАїбАђбАЄбААбА≠бАѓ Approve бАЬбАѓбАХбАЇбАБбАЉбАДбАЇбАЄбАЩбАїбАђбАЄбБК Calculation record бАЩбАїбАђбАЄбААбА≠бАѓ Lock бАБбАїбАСбАђбАЄбАБбАЉбАДбАЇбАЄбАЩбАїбАђбАЄбБК Payslip optionбАЩбАїбАђбАЄ бАХбАЂбБАбАДбАЇбАХбАЂбАЮбАКбАЇбБЛ
- Post-Payroll Process 
бАЬбАЕбАђ бА°бАЕбАЃбАЫбАДбАЇбАБбАґбАЕбАђ-Pay Reports бАЩбАїбАђбАЄбААбА≠бАѓ бАРбАЕбАЇбАЬбАФбАЊбАДбАЈбАЇ бАРбАЕбАЇбАЬ Comparison- бАФбАЊбА≠бАѓбАДбАЇбАЄбАЪбАЊбА•бАЇбАХбАЉбАЃбАЄ бАСбАѓбАРбАЇбАЬбА≠бАѓбАЈбАЫбАФбА≠бАѓбАДбАЇбАЮбАЬбА≠бАѓ Monthly, Yearly бА°бАЬбА≠бАѓбААбАЇ бАЖбА≠бАѓбАХбАЉбАЃбАЄ бАСбАѓбАРбАЇбАЬбА≠бАѓбАЈбАЬбАКбАЇбАЄ бАЫбАХбАЂбАЩбАКбАЇбБЛ бА°бАЕбА≠бАѓбАЄбАЫбААбА≠бАѓ бА°бАЬбАѓбАХбАЇбБАбАФбАЇбАСбАЩбАЇбАЄбАЩбАїбАђбАЄ бАХбА±бАЄбАЖбА±бАђбАДбАЇбАЫбАЮбАКбАЈбАЇ бАЭбАДбАЇбАДбАљбА±бАБбАљбАФбАЇбАФбАЊбАДбАЈбАЇбАЖбА≠бАѓбАДбАЇбАЮбА±бАђ Monthly, Quarterly- Report бАЩбАїбАђбАЄбААбА≠бАѓбАЬбАКбАЇбАЄ бАСбАѓбАРбАЇбАЬбА≠бАѓбАЈ бАЫбАЩбАКбАЇбАЦбАЉбАЕбАЇбАХбАЂбАЮбАКбАЇбБЛ
бА°бАЮбАѓбАґбАЄбАХбАЉбАѓбАЫбАЩбАКбАЈбАЇ Menu бАЩбАїбАђбАЄ
1. Pre-Payroll Process бАРбАљбАДбАЇ
Master бА°бА±бАђбААбАЇбАЩбАЊ
1.1 Job code setup
1.2 Payment Title
1.3 Payment Rule
Payroll Management бА°бА±бАђбААбАЇбАЩбАЊ
1.4 Payment Definition
1.5 Addition & Deduction
1.6 Award and Deduction
1.7 Salary Adjustment
1.8 Loan, Advanced and Saving бАЩбАїбАђбАЄ бАХбАЂбБАбАДбАЇбАХбАЂбАЮбАКбАЇбБЛ
2. Actual Payroll Calculation & Approve Process бАРбАљбАДбАЇ¬†
Payroll Management бА°бА±бАђбААбАЇбАЩбАЊ
2.1 Payment Calculation
2.2 Payment Approve
2.3 Finish Job Code by Employee бАЖбА≠бАѓбАХбАЉбАЃбАЄ бАХбАЂбБАбАДбАЇбАХбАЂбАЮбАКбАЇбБЛ
3. Post-Payroll Process бАРбАљбАДбАЇ
Report бА°бА±бАђбААбАЇбАЩбАЊ
3.1 Payment Comparison
3.2 Monthly Payment Report
3.3 SSB Contribution Report
3.4 Quarterly Tax Report
3.5 Tax Summary Report
3.6 Personal Income Tax IRD 16 Report бАЩбАїбАђбАЄ бАХбАЂбБАбАДбАЇбАХбАЂбАЮбАКбАЇбБЛ
Detail: How to set up?
1. Pre-Payroll Process
1.1 Job Code Setup
Step1: Go to Left Menu Panel >>Find > Master > Job Code Setup> Add New
Step2: Write >> Jobe Code Name > Description > Per Amount > Save
Sample video link:
1.2 Payment Title
Step1: Go to Left Menu Panel >>Find Master > Payment Title> Add New
Setp2: Write >> Description > Choose – Payment Method (dropdown) > Choose – Payment Type(checkbox) > Save
Sample video link:
1.3 Payment Rule
Step1: Go to Left Menu Panel >>Find Master > Payment Rule > Add Payment Rule
Step2: Write>> Rule Description
>Choose color – Rule Color
>Choose dropdown –¬† ¬† Payment Type
>Write – Rule Display Name >Rule Display Name In Myanmar>Write – Rule Condition & Calculation
>Choose options>> Include In Payslip > Show Amount Zero > Use Bank Payment > Use Round Amount
Step3: Choose dropdown – Payment Rule Type
Step4: Choose Formula or Choose Wizard (thatвАЩs depend on payment Rule Type)
Step5: Save
Sample video link:
Remark: Payroll rule бАЩбАїбАђбАЄбААбА≠бАѓ Rule Team бАЩбАЊ бАЮбАЃбАЄбАЮбАФбАЈбАЇ бААбА≠бАѓбАДбАЇбАРбАљбАЪбАЇбАХбАЉбАЃбАЄ Policy бАЩбАїбАђбАЄбААбА≠бАѓ бАЮбАРбАЇбАЩбАЊбАРбАЇбАСбАђбАЄбАЮбАКбАЈбАЇ Rule Confirmation бА°бАРбА≠бАѓбАДбАЇбАЄ бАРбАКбАЇбАЖбА±бАђбААбАЇбАХбА±бАЄбАЩбАКбАЇбАЦбАЉбАЕбАЇбАХбАЂбАЮбАКбАЇбБЛ
1.4 Payment Definition
1.4.1 Payment Definition(Way1-directly input data)
Step1: Go to Left Menu Panel >> Find Payroll Management > Payment Definition
Step2: Choose Employee by Organization structure or Filter by Employee > Preview
Step3: Write **Amount** >Under the Columns defined for BasicSalary & others allowances > Save
Sample video link:
1.4.2 Payment Definition(Way2-import by Excel)
Step1: Go to Left Menu Panel >> Find Payroll Management > Payment Definition
Step2: Choose Employee by Organization structure or Filter by Employee > Preview
Step3: Click вАЬExcel ExportвАЭ icon ![]() ¬† (The Excel file will drop in Download Folder).
  (The Excel file will drop in Download Folder).
Step4: Open the Downloaded excel file named Payment Defintion Report.
Step5: Fill the Salary data and other allowances data in Excel.
Step6: Click вАЬImport ExcelвАЭ icon ![]() .
.
Step7: Click Browse File ![]() >> Find, Double click on the file or select the Excel data file and Click Open.
>> Find, Double click on the file or select the Excel data file and Click Open.
Step8: Click Validate Data.
**If the Excel data has an error, the error code will be shown the red words and the Import Data button doesnвАЩt show.**
Step9: Click Import Data.
Step10: Click Preview again for look the imported Data.
Sample Video Link:
1.5 Addition & Deduction
1.5.1 Addition & Deduction(Way1-directly input data)
Step1: Go to Left Menu Panel >> Find Payroll Management > Addition & Deduction
Step2: Choose Employee by Organization structure or Filter by Employee > Preview
Step3: Write **Amount** >Under the Columns defined for Addition or Deduction > Save
Tips: three vertical icon ![]() for Apply this row data to all employees | Apply this column data to all employees
for Apply this row data to all employees | Apply this column data to all employees
Sample Video Link:
1.5.2 Addition & Deduction(Way2-import by Excel)
Step1: Go to Left Menu Panel >> Find Payroll Management > Addition & Deduction
Step2: Choose Employee by Organization structure or Filter by Employee > Preview
Step3: Click вАЬExcel ExportвАЭ icon ![]() . (The Excel file will drop in Download Folder).
. (The Excel file will drop in Download Folder).
Step4: Open the Downloaded excel file named Payment Addition and Deduction Report.
Step5: Fill the addition and deduction data in Excel.
Step6: Click вАЬImport ExcelвАЭ icon ![]() .
.
Step7: Click Browse File![]() >> Find, Double click on the file or select the Excel data file and Click Open.
>> Find, Double click on the file or select the Excel data file and Click Open.
Step8: Click Validate Data.
**If the Excel data has an error, the error code will be shown the red words and the Import Data button doesnвАЩt show.**
Step9: Click Import Data.
Step10: Click Preview again for look at the imported Data.
Sample Video Link:
1.6 Award and Deduction
1.6.1 Award and Deduction(Way1-directly input data) 
Step1: Go to Left Menu Panel >> Find Payroll Management > Award and Deduction
Step2: Choose Employee by Organization structure or Filter by Employee > Preview
Step3: Click Check on ![]()  >
¬†> ![]() and Choose вАЬAward and Deduction DateвАЭ
and Choose вАЬAward and Deduction DateвАЭ
Step4: Click Check on  ![]() >
> ![]() and Choose Employee after Preview(Step2).
and Choose Employee after Preview(Step2).
Step5: Click Add New ![]() >Choose Date> Choose Payment Title> Type **Amount**
>Choose Date> Choose Payment Title> Type **Amount**
Step6: Choose ![]() Payment or
Payment or ![]() Deduction.
Deduction.
Step7: Click Check on ![]() >
> ![]() and Use Pay Plan
and Use Pay Plan
Step8: Choose ![]() Depend on Amount Per Month or
Depend on Amount Per Month or ![]() Depend on Frequency
Depend on Frequency
If choose ![]() Depend on Amount Per Month,
Depend on Amount Per Month,
Need to write the Amount in Amount per Month: And Click other places anywhere for changes.
If choose ![]() Depend on Frequency,
Depend on Frequency,
Need to write the month count in Frequency: And Click other places anywhere for changes.
Check Start Date and End Date for the pay plan.
**End Date will be changed after you choose ![]() Depend on Amount Per Month or
Depend on Amount Per Month or ![]() Depend on Frequency**
Depend on Frequency**

Step9: Can write вАЬRemarkвАЭ > then Click вАЬSaveвАЭ.
Sample Video Link:
1.6.2 Award and Deduction(Way2-import by Excel)
Step1: Go to Left Menu Panel >> Find Payroll Management > Award and Deduction
Step2: Choose Employee by Organization structure or Filter by Employee > Preview
Step3: Click Check on ![]() >
> ![]() and Choose вАЬAward and Deduction DateвАЭ
and Choose вАЬAward and Deduction DateвАЭ
Step4: Click Check on ![]() >
>![]() and Choose Employee after Preview(Step2).
and Choose Employee after Preview(Step2).
Step5: Click вАЬDownload templateвАЭ icon ![]() (The Excel file will drop in the Download Folder).
(The Excel file will drop in the Download Folder).
Step6: Open the Downloaded excel file named Award and Deduction.
Step7: Fill the Award and Deduction data in Excel.
Sample Excel File Format:
 Step8: Click вАЬImport ExcelвАЭ icon
 ![]() .
.
Step9: Click Browse File ![]() >> Find, Double click on the file or select the Excel data file and Click Open.
>> Find, Double click on the file or select the Excel data file and Click Open.
Step10: Click Validate Data.
**If the Excel data has an error, the error code will be shown the red words and the Import Data button doesnвАЩt show.**
Sample Video Link:
1.7 Salary Adjustment
1.7.1 Salary Adjustment (Way1-directly input data)
Step1: Go to Left Menu Panel >> Find Payroll Management > Salary Adjustment
Step2: Choose Employee by Organization structure or Filter by Employee > Preview
Step3: Click Check on ![]() >
>![]() and Choose вАЬAdjustment DateвАЭ
and Choose вАЬAdjustment DateвАЭ
Step4: Click Check on  ![]() >
>![]() and Choose Employee after Preview(Step2).
and Choose Employee after Preview(Step2).
Step5: Click Add New ![]() and Choose Date >>
and Choose Date >>
![]() and
and
![]() and
and
.![]()
Step6: Choose ![]() Increase or
Increase or ![]() Decrease.
Decrease.
Step7: Choose Amount Title in ![]() Drop down box.
Drop down box.
Step8: Choose options by Adjustment Amount
![]() or
or ![]() Percent.
Percent.
Step9: Write Comment (can skip)

Step10: Click вАЬSaveвАЭ.
Sample Video Link:
1.7.2 Salary Adjustment(Way2-import by Excel)
Step1: Go to Left Menu Panel >> Find Payroll Management > Salary Adjustment
Step2: Choose Employee by Organization structure or Filter by Employee > Preview
Step3: Click вАЬDownload templateвАЭ icon ![]() (The Excel file will drop in the Download Folder).
(The Excel file will drop in the Download Folder).
Step4: Open the Downloaded excel file named Salary Adjustment.
Step5: Fill the Salary adjustment data in Excel.
Step6: Click вАЬImport ExcelвАЭ icon![]() .
.
Step7: Click Browse File ![]() >> Find, Double click on the file or select the Excel data file and Click Open.
>> Find, Double click on the file or select the Excel data file and Click Open.
Step8: Click Validate Data.
**If the Excel data has an error, the error code will be shown the red words and the Import Data button doesnвАЩt show.**
Step9: Click Import Data.
Sample Video Link:
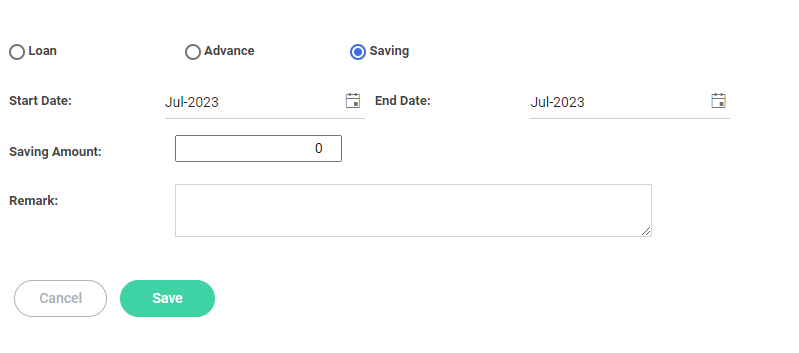
1.8 Loan, Advanced and Saving
1.8.1 Loan, Advanced and Saving(Way1-directly input data)
Step1: Go to Left Menu Panel >> Find вАЬPayroll ManagementвАЭ > вАЬLoan, Advanced and SavingвАЭ
Step2: Choose Employee by вАЬOrganization structureвАЭ or select Employee вАЬFilter by EmployeeвАЭ > Preview
Step3: Click Check on ![]() >
> ![]() and Choose вАЬTranscation DateвАЭ
and Choose вАЬTranscation DateвАЭ
Step4: Click Check on  ![]() >
> ![]() and Choose Employee after Preview(Step2).
and Choose Employee after Preview(Step2).
Step5: Click Choose Type >> Loan or Advance or Saving
Step6: Click Add New  ![]()  
 
Step7: Set вАЬDateвАЭ¬†
![]()
Step8: Set вАЬAmountвАЭ for Loan Amount and can also apply set вАЬInterest Rate(%)вАЭ.
![]()
Step9: Write вАЬRemarkвАЭ. (can skip for write)

Step10: Set the Pay Back Plan.
Step11: Set вАЬPlan Start DateвАЭ.

Step12: Choose options > Depend on Amount Per Month
  > Depend on Frequency

Step13: Write Description.(can skip)

Sample Video Link:
Tips for Loan, Advanced and Saving:
- Advanced бАФбАЊбАДбАЈбАЇ Saving бАЩбАїбАђбАЄбААбА≠бАѓ бАЬбАКбАЇбАЄ Choose Type бАРбАљбАДбАЇ бАЫбАљбА±бАЄбАБбАїбАЪбАЇ бАСбАКбАЈбАЇбАЬбА≠бАѓбАЈбАЫбАФбА≠бАѓбАДбАЇбАХбАЂбАЮбАКбАЇбБЛ
- Plan Start Date бАЦбАЉбАЕбАЇбАЮбАКбАЈбАЇ бАЬ бАЩбАЊ бАЮбАђ бАЕбАХбАЉбАЃбАЄ бА°бАЬбАѓбАХбАЇбАЬбАѓбАХбАЇбАХбАЂбАЩбАКбАЇбБЛ
- Depend on Amount Per Month бАРбАљбАДбАЇ бАЩбА≠бАЩбА≠ бАФбАЊбАЕбАЇбАЮбААбАЇбАЫбАђ бАЦбАЉбАРбАЇбАЩбАКбАЈбАЇ бАДбАљбА±бАФбАЊбАѓбАФбАЇбАЄ бААбА≠бАѓ бАСбАКбАЈбАЇбАФбА≠бАѓбАДбАЇбАЮбАЬбА≠бАѓ
Depend on Frequency бАРбАљбАДбАЇ бАШбАЪбАЇбАФбАЊ бАЬ бАЦбАЉбАРбАЇбАЩбАКбАЇ бАЖбА≠бАѓ бАРбАђбАЩбАїбА≠бАѓбАЄ бААбА≠бАѓ бАСбАКбАЈбАЇбАЬбА≠бАѓбАЈбАЫбАХбАЂбАЮбАКбАЇбБЛ - бАБбАЉбАљбАДбАЇбАЄбАБбАїбААбАЇ бА°бАФбА±бАФбА≤бАЈ Saving бАЖбА≠бАѓбАЬбАїбАЊбАДбАЇ Start Date бАФбА≤бАЈ¬† End Date бАЖбА≠бАѓбАХбАЉбАЃбАЄ бАЮбАРбАЇбАЩбАЊбАРбАЇбАФбА≠бАѓбАДбАЇбАХбАЂбАЮбАКбАЇбБЛ
2. Actual Payroll Calculation & Approve Process
2.1 Payment Calculation
Step1: Go to Left Menu Panel >> Find Payroll Management > Payment Calculation
Step2: Choose Period (Default Month is showing from system Date time)
Step3: And choose Employee by Organization structure or select by Filter by Employee 
Step4: Click вАЬCalculateвАЭ.
Sample Video:
2.2 Payment Approve
Firstly you must calculate the Payment.
After calculating the Payment Calculation, if the page was been closed,
Step1: Go to Left Menu Panel >> Find Payroll Management > Payment Calculation
Step2: Choose Period (Default Month is showing from system Date time)
Step3: And choose Employee by Organization structure or select by Filter by Employee.
Step4: Click вАЬRetrieveвАЭ.
Or
After calculating the Payment Calculation,
Step1: Click вАЬSend ApproveвАЭ

Step2: Choose вАЬCurrent EmployeeвАЭ or вАЬAll EmployeeвАЭ> then Click вАЬSendвАЭ.
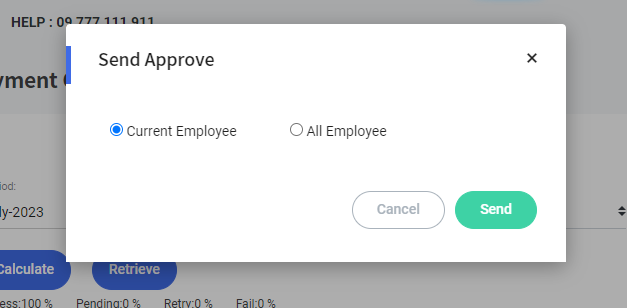 Step3: Go to Left Menu panel > Click Payroll Management > Payment Approve
Step4: Choose Period (Default Month is showing from system Date time)
Step5: And choose Employee by Organization structure or select by Filter by Employee 
Step6: Click вАЬPreviewвАЭ.
And can approve by Single or Multi.
#Multi Way
Step7.1: Click Check on ![]() >
> ![]() the Employee > Click вАЬApprove AllвАЭ.
the Employee > Click вАЬApprove AllвАЭ.
#Single Way
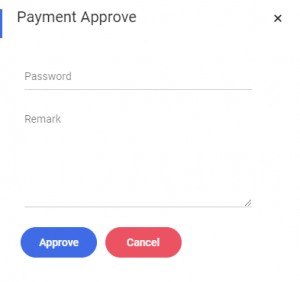
Step7.2: Click вАЬApprove iconвАЭ or¬† вАЭReject iconвАЭ.
 Step8: After Click Approve, need to give the вАЬPasswordвАЭ and вАЬRemarkвАЭ and Click Approve again.
2.3 Finish Job code by Employee
2.3.1 Finish Job code by Employee (Way1-directly input data)
Step1: Go to Left Menu panel > Payroll Management > Finish Job code by Employee
Step2: Choose Period > choose Employee by Organization structure or select by Filter by Employee 
Step3: вАЬSelect Job Code:вАЭ¬†
(This is sample code names, you should need to create first it that is Job Code Setup.)
Step4: Click вАЬPreviewвАЭ.
Step5: Then fill the data >> Finish Quantity

Step6: After fill the data, Click вАЬSaveвАЭ.
2.3.2 Finish Job code by Employee (Way2-import by Excel)
Step1: Go to Left Menu panel > Payroll Management > Finish Job code by Employee
Step2: Choose Period > choose Employee by Organization structure or select by Filter by Employee 
Step3: Choose Row View or Column View.
Step4: Click вАЬDownload templateвАЭ icon![]() (The Excel file will drop in the Download Folder).
(The Excel file will drop in the Download Folder).
Step5: Open the Downloaded excel file named Finish Job Code.
Step6: Fill the Job code data in Excel.
Step7: Click вАЬImport ExcelвАЭ icon ![]() .
.
Step8: Click Browse File ![]() >> Find, Double click on the file or select the Excel data file and Click Open.
>> Find, Double click on the file or select the Excel data file and Click Open.
Step9: Click Validate Data.
**If the Excel data has an error, the error code will be shown the red words and the Import Data button doesnвАЩt show.**
Step10: Click Import Data.
Payroll – System Software бАЮбАѓбАґбАЄбАБбАЉбАДбАЇбАЄбААбАЉбА±бАђбАДбАЈбАЇ бА°бААбАїбА≠бАѓбАЄбААбАїбА±бАЄбАЗбА∞бАЄбАЩбАїбАђбАЄ?
бА°бАУбА≠бАА Software бААбА≠бАѓ бА°бАЮбАѓбАґбАЄбАХбАЉбАѓбАБбАЉбАДбАЇбАЄбАЮбАКбАЇ бА°бАБбАїбА≠бАФбАЇбААбАѓбАФбАЇбАЮбААбАЇбАЮбАђбАБбАЉбАДбАЇбАЄбБК бАСбА≠бАЫбА±бАђбААбАЇбАЩбАЊбАѓбАЫбАЊбА≠бАБбАЉбАДбАЇбАЄбБК бАРбА≠бААбАїбАЩбАЊбАѓбАЫбАЊбА≠бАБбАЉбАДбАЇбАЄбБКбБК бАБбАїбА≤бАЈбАСбАљбАДбАЇбАФбА≠бА∞бАДбАЇбАБбАЉбАДбАЇбАЄбБК бАЩбАЊбАРбАЇбАРбАЩбАЇбАЄбАСбА≠бАФбАЇбАЄбАЮбА≠бАЩбАЇбАЄбАБбАЉбАДбАЇбАЄбАФбАЊбАДбАЈбАЇ бА°бАЕбАЃбАЫбАДбАЇбАБбАґбАБбАЉбАДбАЇбАЄбАЩбАїбАђбАЄ бАЕбАЮбА±бАђ бА°бААбАїбА≠бАѓбАЄбААбАїбА±бАЄбАЗбА∞бАЄбАЩбАїбАђбАЄ бАЫбАЮбА±бАђбААбАЉбА±бАђбАДбАЈбАЇ бАЬбАѓбАХбАЇбАДбАФбАЇбАЄбА°бАЦбАљбА≤бАЈбА°бАЕбАКбАЇбАЄбАЩбАїбАђбАЄбАРбАљбАДбАЇ бАЮбАѓбАґбАЄбАЮбАДбАЈбАЇбАХбАЂбАЮбАКбАЇбБЛ бА°бАЮбА±бАЄбАЕбА≠бАРбАЇ бАЖбА≠бАѓбАЫбАЬбАїбАЊбАДбАЇ –
бА°бАБбАїбА≠бАФбАЇбААбАѓбАФбАЇбАЮбААбАЇбАЮбАђбАБбАЉбАДбАЇбАЄ¬† бБЛ ¬† ¬† ¬† бБЛбААбАЉбА≠бАѓбАРбАДбАЇбАЮбАРбАЇбАЩбАЊбАРбАЇбАСбАђбАЄбАЮбА±бАђ бАЕбАКбАЇбАЄбАЩбАїбАЙбАЇбАЄбАЩбАїбАђбАЄбАФбАЊбАДбАЈбАЇ бАЦбА±бАђбАЇбАЩбАЉбА∞бАЬбАђбАЩбАїбАђбАЄбА°бАХбА±бАЂбАЇ бА°бАБбАЉбА±бАБбАґбБН бАЭбАФбАЇбАСбАЩбАЇбАЄбАЬбАѓбАХбАЇбАБбАЩбАїбАђбАЄбБК бА°бАБбАљбАФбАЇбАЩбАїбАђбАЄбБК бАФбАѓбАРбАЇбАЪбА∞бАЩбАЊбАѓбАЩбАїбАђбАЄбАФбАЊбАДбАЈбАЇ бА°бААбАїбА≠бАѓбАЄбАБбАґбАЕбАђбАЄбАБбАљбАДбАЈбАЇбАЩбАїбАђбАЄбААбА≠бАѓ бА°бАЬбАљбАЪбАЇбАРбААбА∞ бАРбАљбААбАЇбАБбАїбААбАЇ бАФбА≠бАѓбАДбАЇбАЮбАКбАЇбБЛ Payroll process (бАЬбАЕбАђбАЬбАѓбАХбАЇбАДбАФбАЇбАЄбАЕбА•бАЇ) бААбА≠бАѓ бАХбА≠бАѓбАЩбА≠бАѓбАБбАїбА±бАђбАЩбАљбА±бАЈбАЕбА±бАХбАЉбАЃбАЄ HR бАФбАЊбАДбАЈбАЇ Finance бАЩбАїбАђбАЄбА°бАђбАЄ бАЬбАЕбАђ бАХбА±бАЄбАЮбАКбАЈбАЇ бАЬбАѓбАХбАЇбАДбАФбАЇбАЄбАРбАђбАЭбАФбАЇбАЩбАїбАђбАЄбААбА≠бАѓ бАХбА≠бАѓбАЩбА≠бАѓбАЩбАЉбАФбАЇбАЖбАФбАЇбАСбА≠бАЫбА±бАђбААбАЇбАЕбАљбАђ бАХбАЉбАЃбАЄбАЩбАЉбА±бАђбААбАЇбАЕбА±бАХбАЂбАЮбАКбАЇбБЛ¬†
бАСбА≠бАЫбА±бАђбААбАЇбАЩбАЊбАѓбАЫбАЊбА≠бАБбАЉбАДбАЇбАЄ ¬† ¬† ¬† бБЛ ¬† ¬† ¬† бБЛбАЬбАѓбАХбАЇбАБбАЬбАЕбАђбАРбАљбААбАЇбАБбАїбААбАЇбАБбАЉбАДбАЇбАЄбБК бА°бАБбАљбАФбАЇбАЩбАїбАђбАЄбАФбАЊбАДбАЈбАЇ бАФбАѓбАРбАЇбАЪбА∞бАБбАЉбАДбАЇбАЄбАЩбАїбАђбАЄбААбА≤бАЈбАЮбА≠бАѓбАЈ бАЬбАЕбАђ бАХбА±бАЄбАБбАїбА±бАЩбАЊбАѓ бАЬбАѓбАХбАЇбАДбАФбАЇбАЄбАЕбАЙбАЇбБП бААбАПбАєбАНбАЩбАїбАђбАЄбАЕбАљбАђбААбА≠бАѓ бАЬбАѓбАХбАЇбАЖбА±бАђбАДбАЇбАХбА±бАЄбАХбАЂбАЮбАКбАЇбБЛ бАЬбААбАЇбАЦбАЉбАДбАЈбАЇ бАРбАљбААбАЇбАБбАїбААбАЇбАЩбАЊбАѓбАЩбАїбАђбАЄбАФбАЊбАДбАЈбАЇ бАЕбАђбАЫбАљбААбАЇбАЕбАђбАРбАФбАЇбАЄ бАЩбАїбАђбАЄбАЮбАКбАЇ бА°бАБбАїбА≠бАФбАЇбААбАѓбАФбАЇбАФбА≠бАѓбАДбАЇбАХбАЉбАЃбАЄ бА°бАЩбАЊбАђбАЄбА°бАЪбАљбАДбАЇбАЄбАЩбАїбАђбАЄ бАЦбАЉбАЕбАЇбАФбА≠бАѓбАДбАЇбАЮбА±бАђбААбАЉбА±бАђбАДбАЈбАЇ бАЬбАЕбАђбААбА≠бАЕбАєбАЕ бАЮбАКбАЇ бА°бАСбА∞бАЄ бА°бАЫбА±бАЄбААбАЉбАЃбАЄбАХбАЂбАЮбАКбАЇбБЛ
бАРбА≠бААбАїбАЩбАЊбАѓбАЫбАЊбА≠бАБбАЉбАДбАЇбАЄ¬† ¬† ¬† ¬† ¬† ¬† бБЛ ¬† ¬† ¬† бБЛбАЬбАЕбАђбАРбАљбААбАЇбАБбАїбААбАЇбАЩбАЊбАѓбАЩбАїбАђбАЄбАЮбАКбАЇ бА°бАБбАљбАФбАЇбАФбАЊбАѓбАФбАЇбАЄбАСбАђбАЄбАЩбАїбАђбАЄбБК бА°бАБбАїбА≠бАФбАЇбАХбА≠бАѓбБК бАШбА±бАђбАФбАХбАЇбАЕбАЇбАЩбАїбАђбАЄбАФбАЊбАДбАЈбАЇ бАФбАѓбАРбАЇбАЪбА∞бАЩбАЊбАѓбАЩбАїбАђбАЄбААбА≤бАЈбАЮбА≠бАѓбАЈбАЮбА±бАђ бА°бАЩбАїбА≠бАѓбАЄбАЩбАїбА≠бАѓбАЄбАЮбА±бАђбА°бАБбАїбААбАЇбАЩбАїбАђбАЄбАХбАЂбБАбАДбАЇбБН бАЫбАЊбАѓбАХбАЇбАСбАљбА±бАЄбАФбА≠бАѓбАДбАЇбАХбАЂбАЮбАКбАЇбБЛ Payroll software бАЮбАКбАЇ бА§бАРбАљбААбАЇбАБбАїбААбАЇбАЩбАЊбАѓбАЩбАїбАђбАЄбААбА≠бАѓ бАРбА≠бААбАїбАЕбАљбАђ бАРбАљбААбАЇбАБбАїбААбАЇбАФбА≠бАѓбАДбАЇбАХбАЉбАЃбАЄ бАЭбАФбАЇбАСбАЩбАЇбАЄбАЩбАїбАђбАЄбБП бАДбАљбА±бАХбА≠бАѓбАХбА±бАЄбАБбАїбА±бАЩбАЊбАѓ бАЮбА≠бАѓбАЈбАЩбАЯбАѓбАРбАЇ бАДбАљбА±бАХбА≠бАѓбАЬбАїбА±бАђбАЈбАХбА±бАЄбАЕбА±бАЩбАЊбАѓ бАЖбА≠бАѓбАЮбАКбАЈбАЇ бА°бАЩбАЊбАђбАЄбА°бАЪбАљбАДбАЇбАЄбАЩбАїбАђбАЄ бАЦбАЉбАЕбАЇбАФбА≠бАѓбАДбАЇбАБбАЉбА±бААбА≠бАѓ бАЬбАїбАЊбА±бАђбАЈбАБбАїбАХбА±бАЄбАХбАЂбАЮбАКбАЇбБЛ бА°бАЕбА≠бАѓбАЄбАЫ бА°бАБбАљбАФбАЇ бАЕбАКбАЇбАЄбАЩбАїбА•бАЇбАЄбАЩбАїбАђбАЄбАФбАЊбАДбАЈбАЇ бА°бАЬбАѓбАХбАЇбАЮбАЩбАђбАЄ бА•бАХбАТбА±бАЩбАїбАђбАЄбАФбАЊбАДбАЈбАЇ бА°бАКбАЃ бА°бАБбАљбАФбАЇбА°бАБбАЩбАїбАђбАЄбБКбАЬбА∞бАЩбАЊбАѓбАЦбА∞бАЬбАѓбАґбАЫбА±бАЄбАБбАЩбАїбАђбАЄбААбА≠бАѓ бА°бАРбА≠бА°бААбАї бАЮбА±бАБбАїбАђбАЕбАљбАђ бАРбАљбААбАЇбАБбАїбААбАЇбАХбА±бАЄбАФбА≠бАѓбАДбАЇбАХбАЂбАЮбАКбАЇбБЛ
бАБбАїбА≤бАЈбАСбАљбАДбАЇбАФбА≠бАѓбАДбАЇбАБбАЉбАДбАЇбАЄ¬† ¬† ¬† ¬† ¬† ¬† бБЛ ¬† ¬† ¬† бБЛбАЬбАѓбАХбАЇбАДбАФбАЇбАЄбАЩбАїбАђбАЄбАЫбАЊбА≠ бАЭбАФбАЇбАСбАЩбАЇбАЄбА°бАЫбА±бА°бАРбАљбААбАЇ бАРбА≠бАѓбАЄбАЬбАђбАЮбАКбАЇбАФбАЊбАДбАЈбАЇбА°бАЩбАїбАЊ бАЬбАѓбАХбАЇбАБбАЬбАЕбАђбААбА≠бАѓ бААбА≠бАѓбАЪбАЇбАРбА≠бАѓбАДбАЇбАЕбАЃбАЩбАґбАБбАФбАЈбАЇбАБбАљбА≤бАЫбАФбАЇбАЩбАЊбАђ бАЕбА≠бАФбАЇбАБбА±бАЂбАЇбАЩбАЊбАѓбАЩбАїбАђбАЄ бАХбА≠бАѓбАЩбАїбАђбАЄбАЬбАђбАЩбАКбАЇ бАЦбАЉбАЕбАЇбАХбАЂбАЮбАКбАЇбБЛ Payroll – System Software бАЮбАКбАЇ бАЬбАѓбАХбАЇбАДбАФбАЇбАЄбБП бАЬбА≠бАѓбА°бАХбАЇбАБбАїбААбАЇбАЩбАїбАђбАЄ бА°бАРбА≠бАѓбАДбАЇбАЄ бАСбАѓбАРбАЇбАСбАђбАЄбАРбАђбААбАЉбА±бАђбАДбАЈбАЇ бАЭбАФбАЇбАСбАЩбАЇбАЄбА°бАЩбАїбАђбАЄбА°бАХбАЉбАђбАЄбА°бАРбАљбААбАЇ бАЬбАѓбАХбАЇбАБбАЬбАЕбАђбААбА≠бАѓ бАХбА≠бАѓбАЩбА≠бАѓбАЬбАљбАЪбАЇбААбА∞бАЕбАљбАђ бААбА≠бАѓбАДбАЇбАРбАљбАЪбАЇ бАЦбАЉбА±бАЫбАЊбАДбАЇбАЄбАФбА≠бАѓбАДбАЇбАЕбА±бАХбАЂбАЮбАКбАЇбБЛ
бАЩбАЊбАРбАЇбАРбАЩбАЇбАЄбАСбА≠бАФбАЇбАЄбАЮбА≠бАЩбАЇбАЄбАБбАЉбАДбАЇбАЄбАФбАЊбАДбАЈбАЇ бА°бАЕбАЃбАЫбАДбАЇбАБбАґбАБбАЉбАДбАЇбАЄбАЩбАїбАђбАЄ¬† ¬† бБЛбАЭбАФбАЇбАСбАЩбАЇбАЄ бАЬбАЕбАђбАЭбАДбАЇбАДбАљбА±бАЩбАїбАђбАЄбАФбАЊбАДбАЈбАЇ бАФбАѓбАРбАЇбАЪбА∞бАЩбАЊбАѓбАЩбАїбАђбАЄбАЕбАЮбАКбАЈбАЇ бАЬбАЕбАђбАФбАЊбАДбАЈбАЇбАЖбА≠бАѓбАДбАЇбАЮбАКбАЈбАЇ бА°бАБбАїбААбАЇбА°бАЬбААбАЇбАЩбАїбАђбАЄбААбА≠бАѓ бАЕбАЃбАЩбАґбАБбАФбАЈбАЇбАБбАљбА≤бАЫбАФбАЇбАФбАЊбАДбАЈбАЇ бАЫбАЪбА∞бАЫбАФбАЇ бАЩбАЊбАРбАЇбАРбАЩбАЇбАЄбАСбА≠бАФбАЇбАЄбАЮбА≠бАЩбАЇбАЄбАЩбАЊбАѓбААбА≠бАѓ бАЮбА±бАЮбА±бАБбАїбАђбАБбАїбАђ вАМвАМбАТбА±бАРбАђбАШбА±бАЕбАЇ (Database)бАЩбАїбАђбАЄбАРбАљбАДбАЇ бАЮбА≠бАЩбАЇбАЄбАЖбАКбАЇбАЄбАСбАђбАЄбАХбАЂбАЮбАКбАЇбБЛ бАЬбАЕбА•бАЇ бАЬбАЕбАђбА°бАЕбАЃбАЫбАДбАЇбАБбАґбАБбАЉбАДбАЇбАЄбБК бАЕбАђбАЫбАДбАЇбАЄбАЕбАЕбАЇбАБбАЉбАДбАЇбАЄбБК бАЬбАЕбАђбАДбАљбА±бАЕбАђбАЫбАДбАЇбАЄбАЩбАїбАђбАЄбБК бА°бАЕбА≠бАѓбАЄбАЫбА°бАБбАљбАФбАЇбА°бАЕбАЃбАЫбАДбАЇбАБбАґбАЕбАђбАЩбАїбАђбАЄбАФбАЊбАДбАЈбАЇ бАЬбАѓбАХбАЇбАДбАФбАЇбАЄбАРбАљбАДбАЇбАЄ бААбАѓбАФбАЇбААбАїбАЕбАЫбА≠бАРбАЇбАЩбАїбАђбАЄбААбА≠бАѓ бА°бАЮбА±бАЄбАЕбА≠бАРбАЇ бАСбАѓбАРбАЇбАХбА±бАЄбАФбА≠бАѓбАДбАЇбАХбАЂбАЮбАКбАЇбБЛ