Global HR Articles Center
Feature: Duty Roster
Purpose:
- Assign work shifts to employees based on their specific duties and tasks.
- Plan and organize workforce schedules effectively.
Prerequisites:
- Shifts must be pre-defined in the Shift Policy module.
Key Points:
- Assign shifts to employees individually or in bulk.
- View and manage duty rosters by date, employee, or shift.
- Export duty rosters to Excel for reporting or analysis.
- Import duty rosters from Excel for quick and easy scheduling.
- Filter and search duty rosters by various criteria.
How to Use Duty Roster:
- Access the Duty Roster:
- Go to the Time Attendance module.
- Click on Duty Roster.
- Choose a Period:
- Select the time period for which you want to view or assign duty rosters (e.g., Today, This Week, This Month, Custom).
- Select Employees:
- Choose the employees you want to include in the duty roster using the Organization Tree or Filter by Employee options.
- Preview Duty Roster:
- Click the Preview button to view the current duty roster for the selected employees and period.
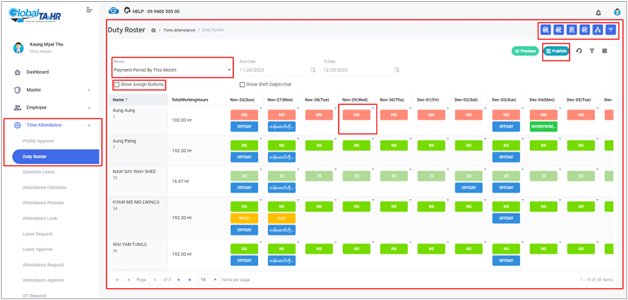
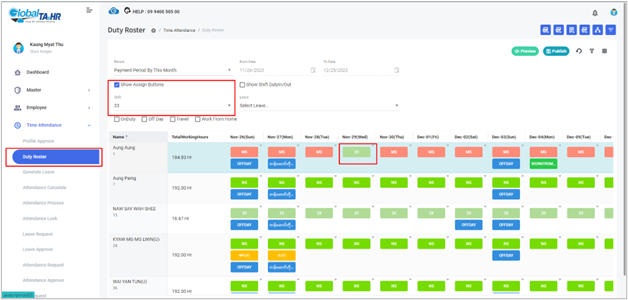
- Assign Duty Roster:
- Method 1: Show Assign Buttons:
- Check the Show Assign Buttons checkbox.
- Select a shift and leave type for each date.
- Click on the Shift Short Code Name box under the date to assign the duty.
- Click Publish to confirm the assignments.
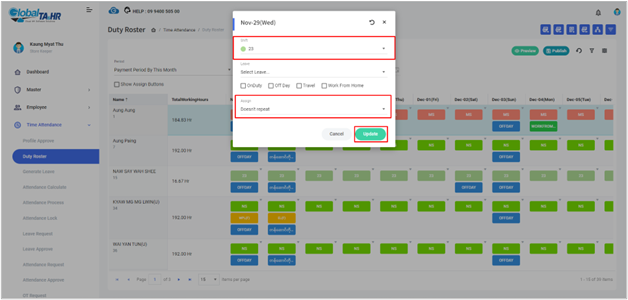
- Method 2: Pop-Up Window Box:
- Click on the Shift Short Code Name box under the date you want to change.
- Select a shift and leave type in the pop-up window.
- Choose an assignment frequency (e.g., Doesn’t Repeat, Daily, Workdays).
- Click Update.
- Click Publish to confirm the assignments.
- Method 3: Excel Import:
- Click the “Download Template”
 icon to download the Excel template.
 - Fill in the template with shift short codes, leave short codes, and employee names.
- Click the “Import Excel” icon.

- Select the filled template file.
- Click Validate Data.
- Click Import Data.
- Click the “Download Template”
- Method 1: Show Assign Buttons:
- Additional Options:
- Reset: Revert to the previous duty roster.
- Copy this assigned data: Duplicate assignments for other dates or employees.
- Cancel this assigned data: Remove assignments.
- Apply this row data to all employees: Apply assignments horizontally for all employees.
- Apply this column data to all employees: Apply assignments vertically for all employees.
- View Roster Transaction: View the history of changes to the duty roster.
- Export Duty Roster:
- Click the “Export Excel”
 icon to create an Excel report of the duty roster.
 - Check the Show Shift Duty In/Out checkbox to include shift timings in the report.
- Click the “Export Excel”
Benefits of Using Duty Roster:
- Improved workforce planning and scheduling
- Enhanced communication and coordination
- Reduced confusion and errors
- Facilitated time-off requests
- Increased compliance with labor laws and company policies
Screenshots: